In 2014, the Walters Art Museum embarked on a plan to renovate and upgrade a historic building that is part of its campus. One West Mount Vernon Place was constructed as a private home in 1850 and became part of the Walters Art Museum in 1991 through the generous gift of the house’s last owners, Willard and Lillian Hackerman. The need for updated fire-suppression systems provided the opportunity for the museum to deinstall the building and reconsider its interpretive use. Rather than a series of galleries used to display artwork, the building was reconceived as a space where the beauty of the neo-classical architecture and the history of the house were a central theme. The displayed works of art would be drawn from the permanent collection but would also include newly created works, providing avenues for comparison and discussion.
During the renovation, conservators at the museum made an exciting discovery in the library of the house. The Department of Conservation and Technical Research was asked to remove fabric paneling from the library walls so that it could be replaced, and they were surprised to see that the original painted ornamental plaster was largely intact, although damaged, behind the fabric. A conservation treatment project soon developed to conserve the original walls so that they could be viewed and enjoyed by the visiting public. The work was innovative in numerous ways: the first use of three-dimensional printing at the museum for a conservation treatment; the use of new silicone solvent cleaning methods, and the successful treatment of a very sensitive original distemper painted architectural finish. Conservators, scientists, curators, designers, contractors, and the art installation team all collaborated to restore the library walls to their original glory, expanding the museum’s knowledge and appreciation of the history of the room and the house along the way.
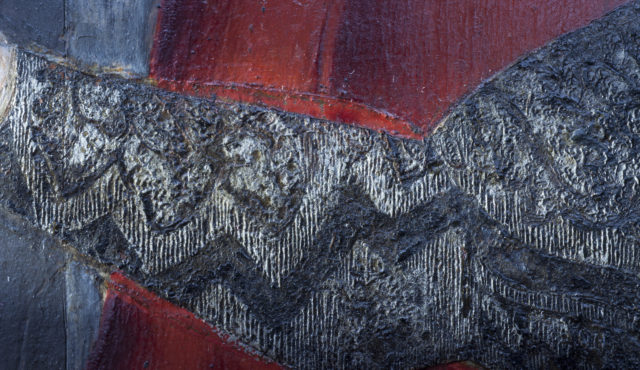
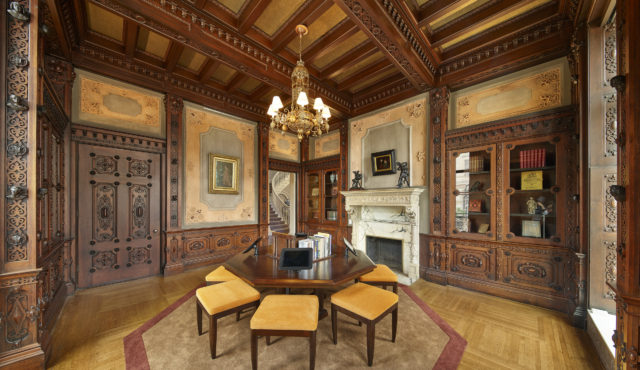
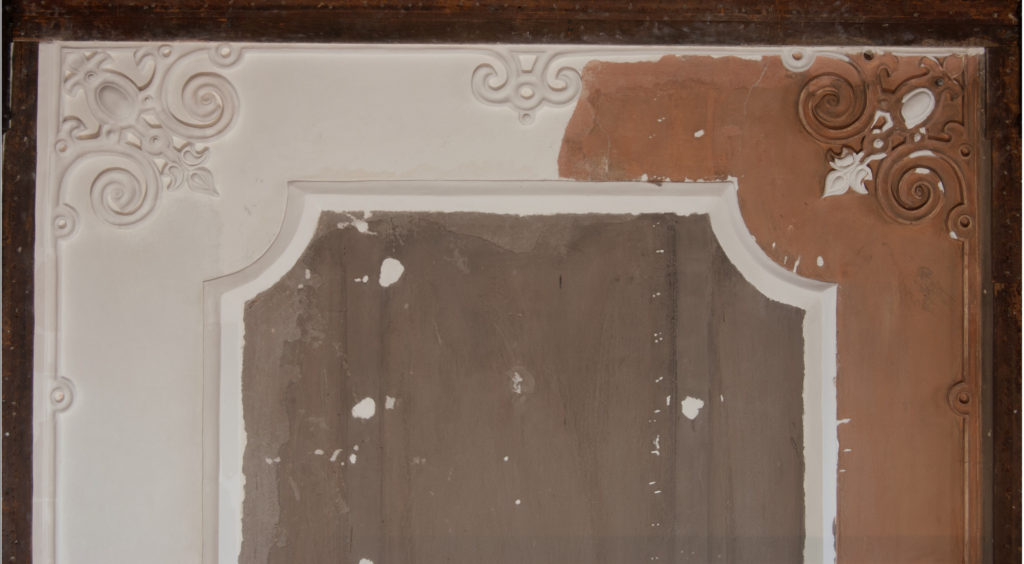
One West Mount Vernon Place was built for the Thomas family and completed in 1850. The library featured elaborate woodwork bookcases with carved heads of historical and literary figures. The plaster walls were decoratively painted, and ornate raised plaster mouldings surrounded the flat plaster panels. Elements of the raised plaster were grain painted to match the surrounding woodwork. Early hand-colored photographs of the room show an elaborate ornamental plaster ceiling, later covered with a wooden beam ceiling (fig. 1). The plaster walls had first been covered with fabric in the 1890s when the house underwent significant alterations by the Jencks family.[1] Their renovation included the installation of new gas and electric lines for wall sconces that cut channels into the original plaster. An air duct had also been added above the fireplace, necessitating the removal of a significant amount of the wall. Furring strips—narrow pieces of wood—had been nailed into the plaster borders of each panel to attach the fabric, and many of the high points of the ornamental plaster had been chiseled off to allow the fabric panels to lie flat (fig. 2). Despite these changes, the walls’ original color scheme was intact. Museum administrators felt that it was important to preserve and display this rare survival of an original architectural painted finish, especially because the house is the largest work of art in the Walters’ collection. The museum’s renewed interest in the history of the house led to the decision to preserve and display this rare survival of an original architectural painted finish.
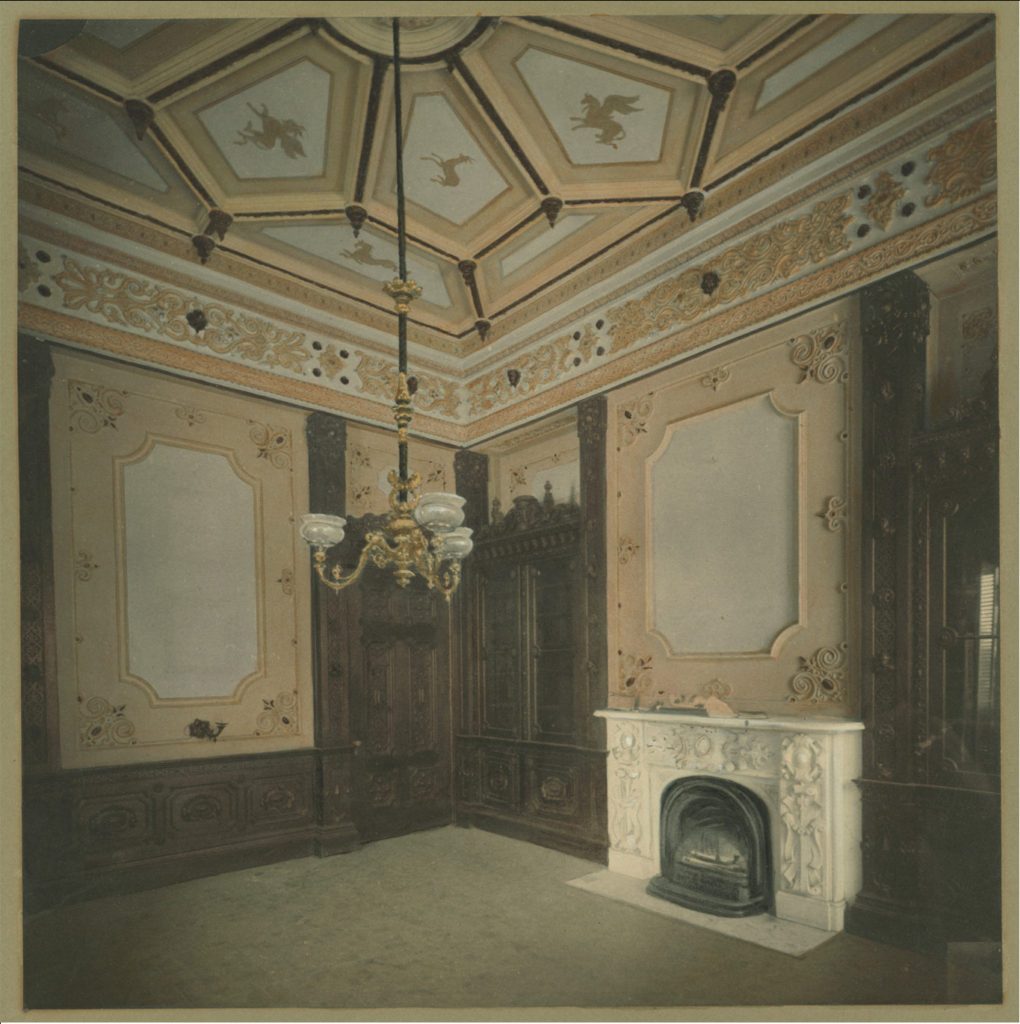
The library of 1 West Mount Vernon Place in 1885. Walters Art Museum Archives.
Archival research into the identities of the artisans who made the walls revealed interesting findings. An 1851 Baltimore Sun article listed George W. Starr as the highly skilled plasterer who worked on 1 West Mount Vernon Place.[2] Additional research showed that he was also responsible for the plaster work at Baltimore’s City Hall and the Maryland Governor’s mansion.[3] Examination of the library walls illustrated Starr’s working methods: the raised ornament was cast in molds, and wooden strips were embedded into the plaster for added support. Dislodged pieces from the original ceiling, which exists in a fragmentary state above the existing ceiling, show score marks that were used to attach the ornamental cast plaster to the plaster on the walls.
The painted decoration was executed by Ernest Dreyer, who was listed as the fresco painter for the house.[4] Unlike true fresco, in which pigment is chemically bound to a mineral matrix, the nineteenth-century use of this term in America refers to decorative painting in distemper (a glue paint binder) and oil.[5] Additional research showed that Dreyer was listed in the Baltimore census of 1850 and 1870 as a fresco painter from Prussia.[6] In 1839 he announced his arrival in Baltimore with an advertisement in the Baltimore Sun that described the painted finishes that he could create.[7] Several other buildings in Baltimore were painted by Dreyer, but little of his work survives. Many of the buildings have been razed, or the interiors significantly altered. Coolmore Plantation in North Carolina boasts some of the best-preserved examples of Dreyer’s frescoes in the United States. The owner of the plantation often traveled to Baltimore, and asked architect E.G. Lind to design his home.[8] Lind recruited Baltimore artisans , including Dreyer, to build the house.
Given the rarity of a surviving architectural distemper painted surface with known makers, it was important to preserve as much of the original painted surface as possible. This approach is somewhat unusual for architectural conservation, and is more in line with the approach conservators take for the treatment of wall paintings. The project was complicated not only by the scale, but also by the paint medium and the support. Cleaning tests conducted on small areas of the wall prior to treatment showed that the paint was soluble in water and many other solvents; therefore a specialized treatment approach needed to be engineered. Distemper paint is composed of pigment, whiting or chalk, and animal glue.[9] While it creates a desirable velvety finish that can imitate the look of true fresco, it has the disadvantage of being very fragile. The painted surface was underbound and powdery in some areas and flaking in others. The painted plaster required stabilization and significant loss compensation. In addition, many areas of previous repair had covered the original painted surface with plaster and spackle. Many of these repairs had caused staining of on the painted surface because of the water content of the repair material and the sensitivity of the original distemper (figs. 2–4).
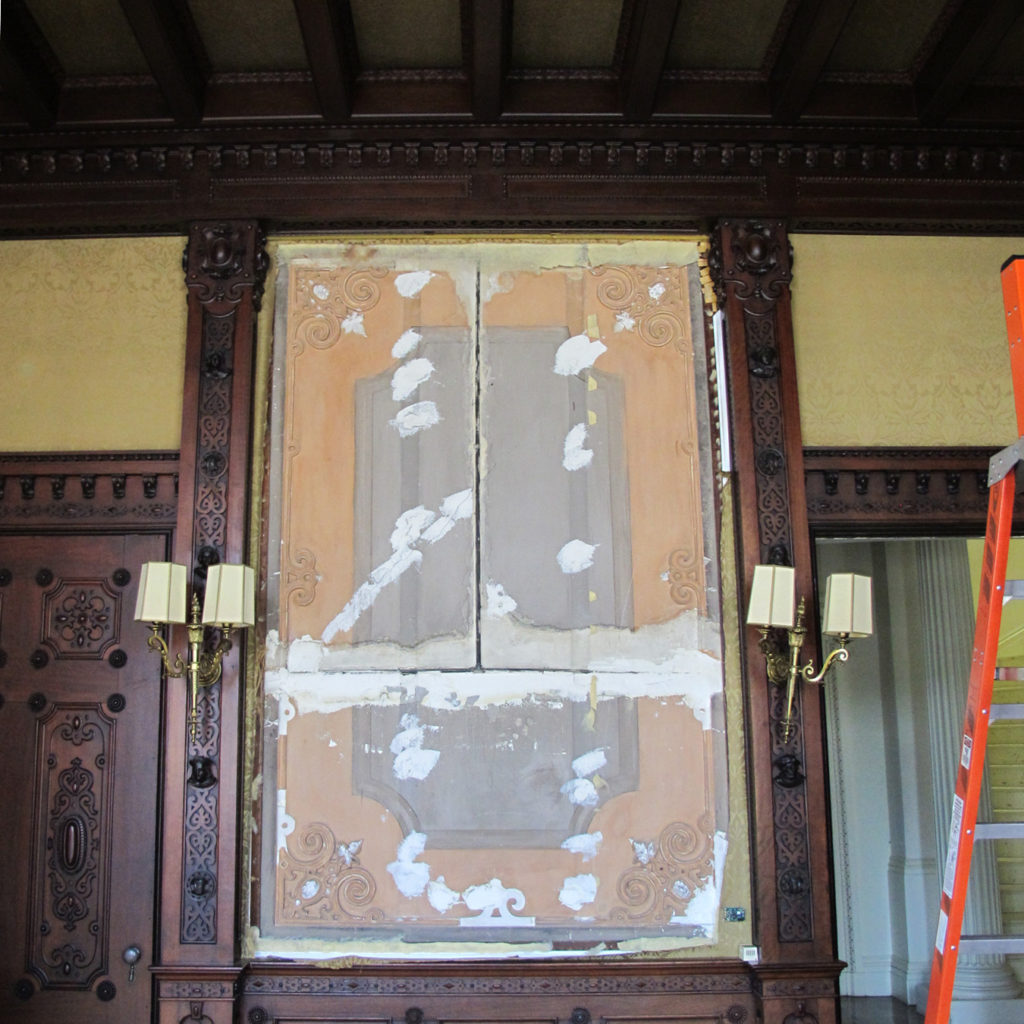
The south wall of the library at 1 West Mount Vernon Place during fabric removal in 2016. Photograph Stephanie Hulman
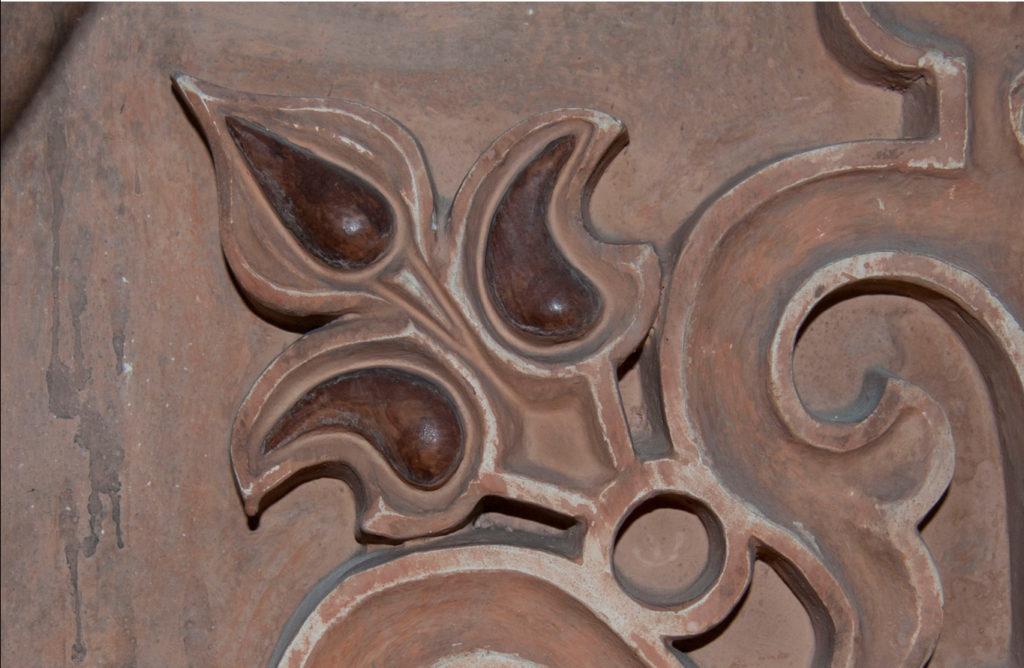
Detail of faux-wood graining on plaster. Photograph Tia Polidori
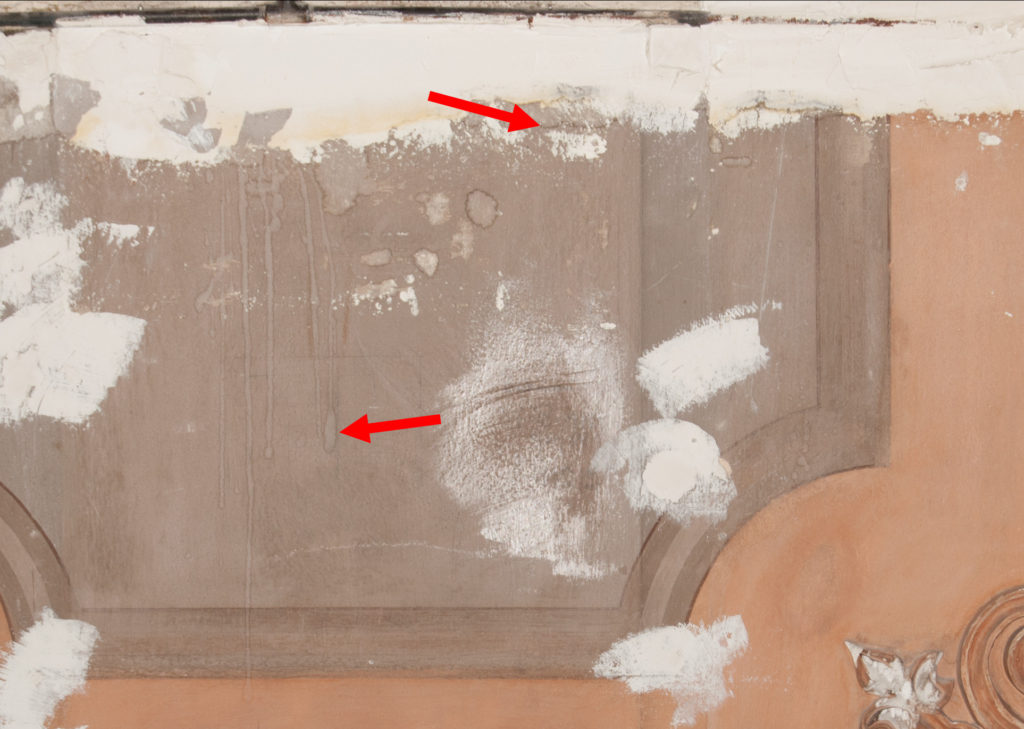
Detail of previous repairs and associated tide lines and drip marks.
Photograph Stephanie Hulman
To examine the structure of the painted finish, samples were collected from existing areas of loss. Cross-sectional analysis showed that the paint stratigraphy included four to five layers of gray paint on top of a terracotta-colored ground (fig. 5). Each layer, containing coarse and fine pigment particles including black, orange, yellow, and blue, had the same elemental composition when examined with scanning electron microscopy coupled with energy-dispersive spectroscopy (SEM-EDS).[10] What appeared to be a slight division, or thin, unpigmented layer, between the gray paint layers became more visible when examined in ultraviolet illumination. The brightly fluorescent layers had the appearance of a proteinaceous glue, a conclusion supported by Fourier transform infrared spectroscopy analyses.[11] No drying oil was identified in the samples using gas chromatography-mass spectrometry (GC-MS).[12] The SEM-EDS analysis also showed the presence of aluminum in the interlayers, suggesting the application of a thin alum-rich glue that served to seal and prime under-layers in preparation for the application of subsequent pigmented glue-rich distemper layers (fig. 5).[13] Given the consistency in appearance and elemental composition of the layers, it appears that all of the paint layers had been applied as part of the same decorative generation.[14] It may have been necessary to apply multiple paint layers to create a smooth surface on top of a rough plaster substrate. The terracotta-colored areas of the painted plaster walls have a much rougher surface texture than the gray areas, likely because there is only one paint layer present.
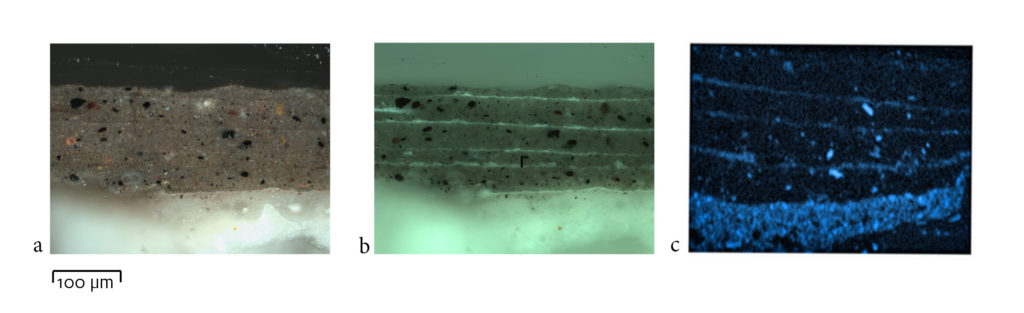
Cross-section sample from an area of gray paint showing multiple layers of paint with a florescent binding medium in between. Elemental analysis of the samples showed a high concentration of aluminum in these layers as well as in the ground. a: Visible light, 20× objective; b. Ultraviolet illumination, Leica D filter, 20× objective; c: SEM-EDS elemental map of aluminum in blue, showing concentration in the interlayers and ground. Photograph Stephanie Hulman
Before conservation could address the paint and plaster, it was necessary to remove the remaining fabric covering. The initial removal of the fabric panels left behind batting, plastic strips, and staples attached both to wood and plaster. As more fabric was removed, important evidence of numerous previous upholstery campaigns became visible. The furring strips around the panels were also found to be holding the plaster in place in some areas. The decision was therefore made to leave the furring strips in place and to cover them over at a later date. The plastic attached to the furring strips was removed first, followed by the staples and traces of batting. The next step was to reduce the later plaster and spackle repairs that had over-filled holes and covered the original painted surface. Most of the removal was completed mechanically with small scalpel blades.
To remove the modern spackle, an innovative treatment method was engineered. Silicone solvents were used to create a temporary barrier layer on the distemper paint surface that would allow a gel to be applied that contained a small amount of water. Normally, this water-containing gel would dissolve the spackle and the distemper paint below, but the barrier layer of silicone solvent protected the surface during treatment.[15] Once the fills were reduced, the painted plaster was surface-cleaned with soot sponges.[16] Some tough grime spots, including greasy fingerprints left by previous workers, could not be removed with any of the tested sponge or solvent-based cleaning methods.
Loss compensation was a challenge given the sensitivity of the painted surface to water and solvents. Great care was required to prevent the formation of new tide lines. To address areas of minor loss in which a portion of the original decorative scheme was intact, a barrier layer of Paraloid B-72 was applied prior to filling.[17] The fill material was a mixture of dilute fish glue that was bulked with marble dust. Initial tests with calcium carbonate as the filler led to cracks upon drying, but interestingly, cracks did not form with the use of marble dust. The filled areas were later shaped with scalpels, files, and small pieces of sandpaper. For large flat fills, it was necessary to mimic the textured surface of the original plaster wall. A thin wash of dilute fill material was bulked with glass micro-balloons and pounced on the surface with the brush to achieve the desired texture.
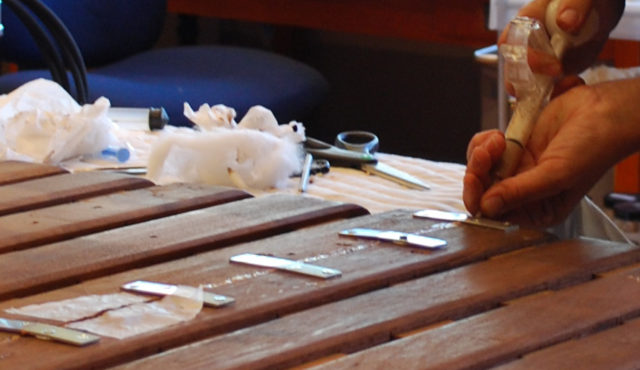
The plaster panel above the fireplace suffered the most significant alteration in the room. A raised frame molding on the wall was removed during the Jencks renovation in the 1890s. Fortunately, a fragment of the original molding remained, and it was possible to use historic photographs to re-create the frame profile. A section of molding was hand built out of clay, molded in silicone, and then cast in plaster. While this method worked for a simple frame profile, the elaborately ornamented corner plaster pieces required a different approach. The paint was too friable to have extended contact with a mold-making material, and any sort of isolation material would have created a more saturated paint surface.
To solve this complicated problem that was created in the nineteenth century, we employed twenty-first century 3D scanning and printing technology with the help of Professor David Antol at Harford Community College. Rather than take a mold of the original surface, it was possible to scan the walls with a Fuel3D Scanify Handheld 3D laser scanner provided by Harford Community College. The scanner works in much the same way as a normal digital point-and-shoot camera.[18] As a result, all of the plaster elements were scanned and processed within a matter of minutes. The images were printed at Harford Community College in polylactic acid (PLA) plastic, and the plastic prints were used to create silicone molds that were subsequently cast in plaster.[19] The size of the printer bed was smaller than some of the plaster elements, so it was necessary to take multiple scans, create multiple prints, and then group them together during the mold-taking process. The molds were stitched together using cheesecloth to reinforce the joint between the partially cured mold and the new mold.
The greatest challenge regarding the 3D scanning and printing process was accurately gauging the depth of the ornament. The scanner had difficulty reading the wall’s matte surfaces and white fill material, and the resulting prints were too shallow or too deep in certain areas.[20] While it would be possible to address this issue by manipulating the original surface or the scans, we chose to make adjustments to the plaster casts of the original 3D prints. After the plaster casts were modified to better match the original ornamental plaster, a new silicone mold was taken, and the resulting plaster casts were ready to be attached to the wall. A solvent-based adhesive was selected for attachment due to the water-sensitive paint, and plaster plugs were used to hold the pieces in place while drying.[21] The cast fragments were further stabilized and integrated with the wall by adding more fill material around the edges (fig. 6).
Detail of the fireplace after filling. The missing raised plaster ornament was created with 3D scanning and printing. Photograph Stephanie Hulman
Once all of the losses were filled and the walls were cleaned and stabilized, an overall consolidation layer was airbrushed onto the paint to reduce its friability and also impart some resistance to water.[22] The Walters installed a mist fire suppression system, so it was necessary to protect against spotting if the system were engaged. While the consolidation was effective at protecting the paint from a fine spray of water, it cannot protect it from large drips of water, which still cause tide lines. Although the walls are still susceptible to liquid water damage, the application of any additional consolidant would have caused an unacceptable level of darkening.
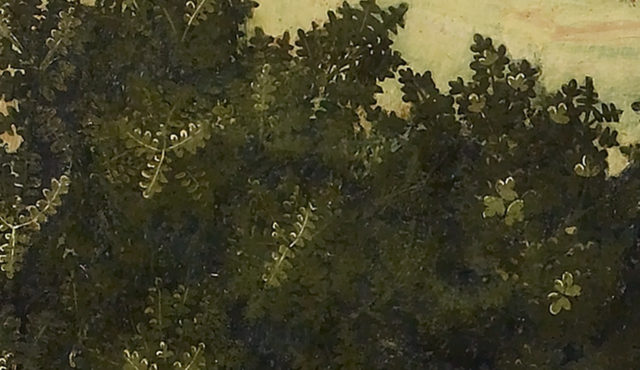
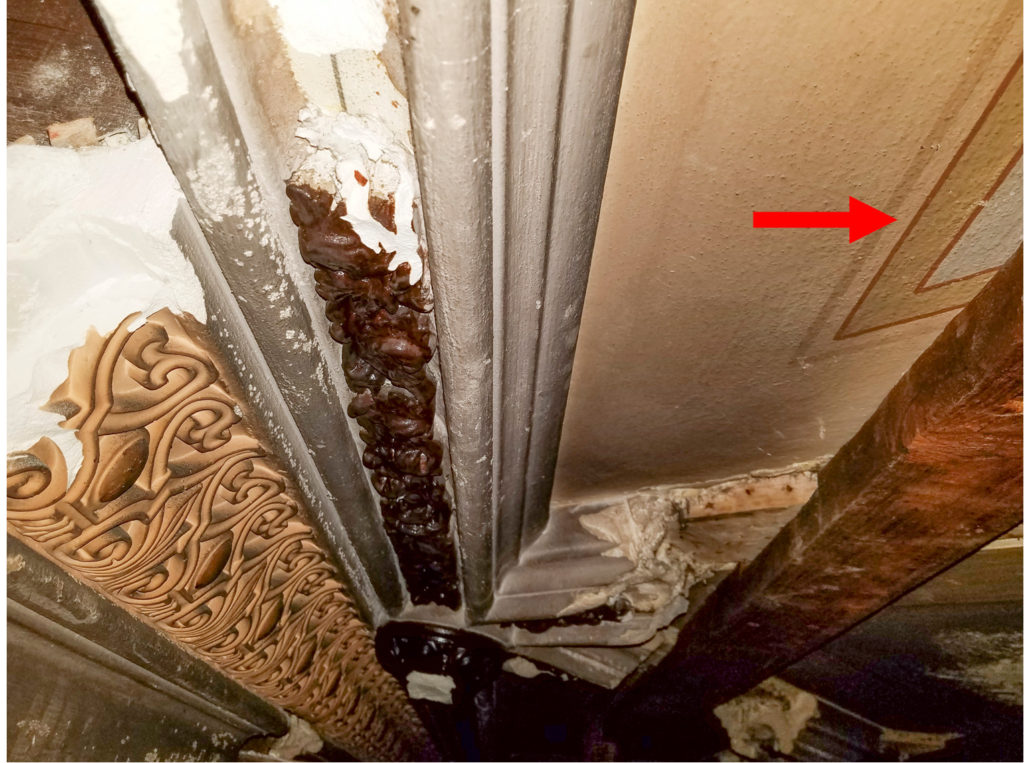
After consolidation was complete, the paintings conservators at the Walters began the process of inpainting fills and areas of damage. Acrylic gouache paint was selected as the inpainting medium because it creates a matte finish and remains soluble in some of the few solvents that are safe to use on the distemper painted surface. As a result, the inpainting can be safely removed if it ever needs to be redone. The main goal of the inpainting was to create a sense of cohesiveness that respected the age and history of the walls. Some of the challenges during this stage included filling large losses that blended with the surrounding aged surface, painting out areas of grime, reducing surface sheen from spackle residues, and reducing tide lines that could not be removed by cleaning methods. To complete the treatment, the installation department at the Walters created and installed covers for the early furring strips (fig. 7). As with any architectural project, there were surprises along the way. One such surprise was the discovery that a large portion of the original ceiling is still intact. Construction above the room gave conservators access to the ceiling, and images show that the cornice matched the color of the walls. Interestingly, the ceiling had some different colors including yellow, blue, and red (fig. 8). The early hand-colored photograph of the room shows that the ceiling was divided into sections by plaster moldings, and the interior areas featured painted mythological figures. Those divisions and central paintings are still visible on the remaining ceiling, although in a fragmentary state. Detached pieces of the cornice were also collected, stabilized, and archivally housed by the conservators for future reference and research.
Fireplace after inpainting and with the addition of the furring strip covers.
Photograph Stephanie Hulman
Remnants of the original ceiling showing additional colors and striping in the central ceiling panels. Photograph Stephanie Hulman
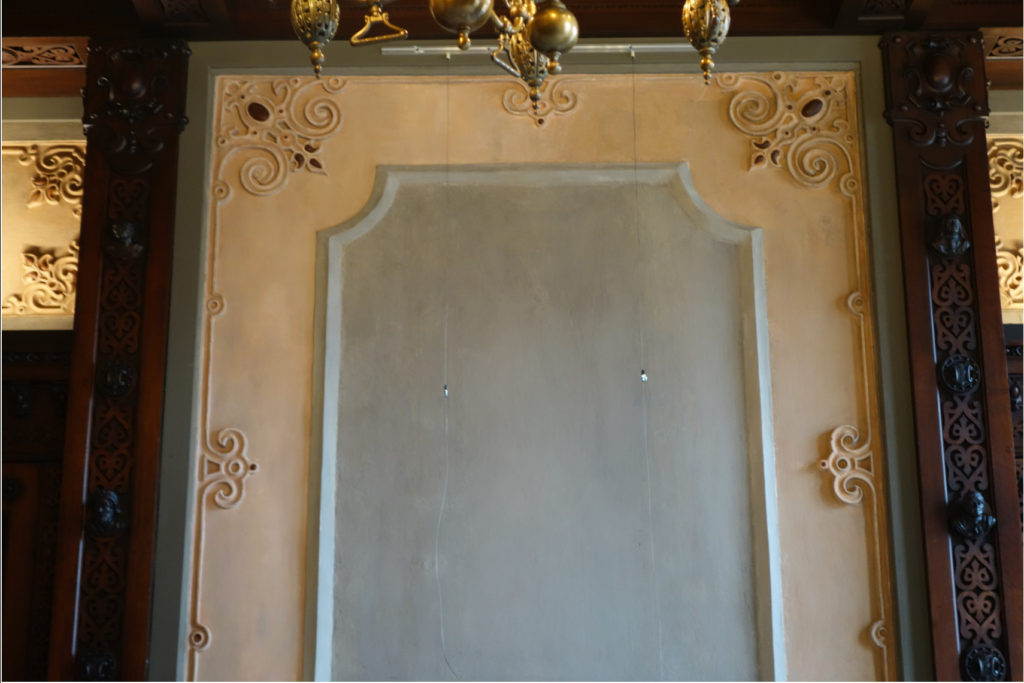
When one enters the library today, the three-dimensionality of the original plaster walls works in harmony with the ornate carving of the original surrounding woodwork. The soft and matte texture of the distemper painted surface contrasts with the glossy polished surface of the wood, and the plaster ornament frames the artwork that hangs on the walls (fig. 9). The space has also been installed with books from the Walters’ collection and iPads on the table where visitors can learn more about the building and the families that called 1 West Mount Vernon Place home. The successful treatment of this architectural distemper painted surface was only possible due to the use of innovative techniques such as 3D laser scanning and printing as well as cleaning with silicone solvents. This treatment might inform other distemper conservation projects, with the goal of creating more time-efficient methods for working on large architectural surfaces. This work was also possible due to the support of the Walters Art Museum, which decided to invest in and research its historic buildings like the works of art that are contained within.
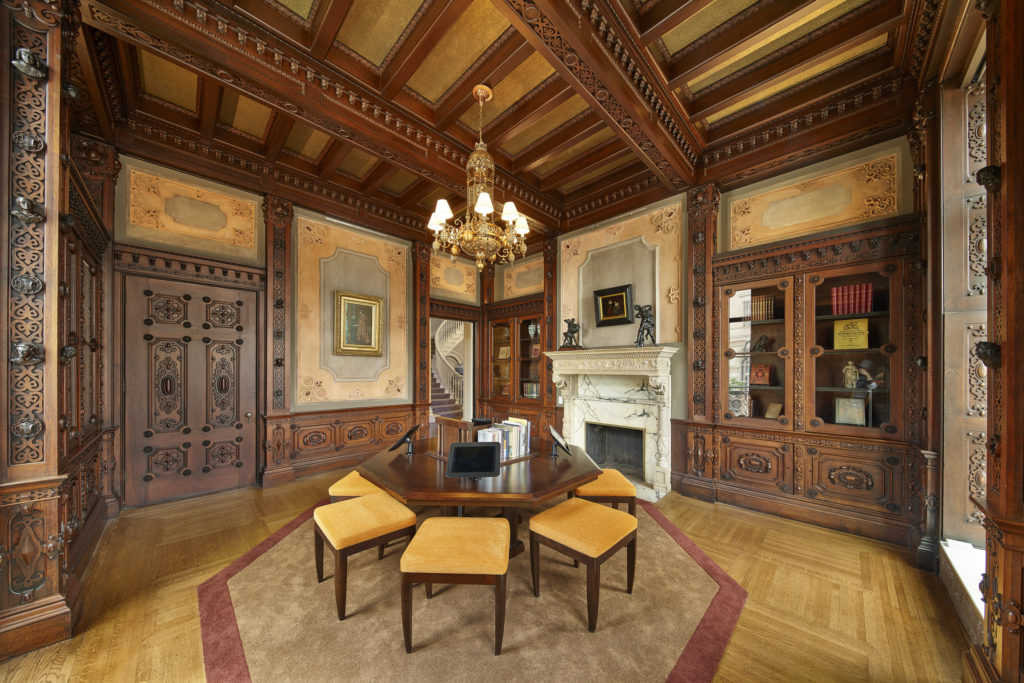
The library at 1 West Mount Vernon Place after conservation, 2018
Photograph ©Jeffrey Totaro
Stephanie Hulman ([email protected]) is the conservator and owner of Decorative Arts Conservation LLC and formerly worked at the Walters Art Museum. Tia Polidori ([email protected]) is a conservation technician at Winterthur Museum and Library and the Walters Art Museum. Glenn Gates ([email protected]) is the Conservation Scientist at the Walters Art Museum.
[1] See Katherine B. Dehler, The Thomas-Jencks-Gladding House: One West Mount Vernon Place (Baltimore, 1968), 26–32, for a discussion of the alterations that were made to the house and completed in 1896.
[2] “A Splendid Dwelling,” Baltimore Sun, January 24, 1851: “The following gentlemen were concerned in the erection of this magnificent mansion: architect Niernsee and Neilson; carpenter, H.J. Bagley; brick work, D. Barger; marble work, Bevan & Sons; painting, Thos. K. Turner; plastering and stucco work, Geo. Starr; fresco painting, E. Dreyer.”
[3] “Award of New City Hall Contracts,” Baltimore Sun, March 19, 1873: “The contract for the plastering was awarded to George W. Starr & Son.” “Letter from Annapolis, Completion of the Government House—Its Formal Delivery to the Legislative Committee—Description of the Mansion-Its Cost, &c.,” Baltimore Sun, December 31, 1869: “In addition to the builder, Wm. T. Markland, and the architect, R. Snowden Andrews, the mechanics engaged up the government house, &c., were as follows: . . . George W. Starr, plasterer. . .”
[4] While Thos. K. Turner is listed as the painter of the house, he is described in the 1851 Baltimore Sun article as a faux finisher who was responsible for the faux wood graining throughout the house. The use of the term “fresco painter” to describe Dreyer’s work implies the type of wall painting present in the library.
[5] For a discussion of historic distemper and oil frescoes, see Morgan W. Phillips, “A Victorian Trompe l’oeil: The Restoration of Distemper Paints,” in Paint in America: The Colors of Historic Buildings, ed. Roger W. Moss (New York, 1994), 155–58.
[6] Dreyer is listed as a fresco painter in the 1850 and 1870 Baltimore census, and is listed numerous times in the Baltimore Director. “United States Census, 1850,” database with images, FamilySearch.org. Maryland, Baltimore, ward 20, image 66 of 178; citing National Archives and Records Administration microfilm publication M432 (Washington, DC).
[7] “To the Public—Ernest Dryer,” Baltimore Sun, February 14, 1839. “Having studied the best European Masters, and acquired this beautiful Art in the principal Academies of Berlin, Munich, Switzerland, and Italy, he is fully competent to execute in the various decorative styles, viz: The ITALIAN, GRECIAN, EGYPTIAN, POMPEIAN, ORIENTAL, GOTHIC, and CHINESE; and also as a LANDSCAPE PAINTER. Specimens of his work may be seen at the Baltimore Assembly Rooms.”
[8] J. Marshall Bulloc and Catherine W. Bishir, “Lind, Edmund George (1829–1909).” North Carolina Architects and Builders: A Biographical Dictionary. North Carolina State University. 2009.
[9] For a discussion of the production and properties of distemper paint, see Morgan W. Phillips, “A Survey of Paint Technology: The Composition and Properties of Paints,” in Paint in America, 1994), 240–42.
[10] The Nova NanoSEM 450 is a modern field-emission scanning electron microscope with 1 nm ultimate resolution, large sample chamber width, advanced motorized stage, and navigation supported by an in-chamber camera. High- and low-vacuum operations are possible. Several detectors are available to observe secondary and backscattered electrons under various conditions and also to obtain STEM images. Beam deceleration allows beam-landing energies from 20 eV to 30 keV. The system also includes EDS and EBSD capability (Oxford Aztec.) The Walters Art Museum’s purchase of the system was funded by NSF MRI grant number DMR_1337727.
[11] The Bruker Optics Tensor 27 coupled with the Hyperion 2000 microscope was used in transmitted mode at 4 wavenumber resolution and 1024 scans following sample compression in a diamond cell; proteins were suggested by prominent vibrations at 1650 and 1540 wavenumber.
[12] Paint samples from the library walls were analyzed at University of Maryland Baltimore County by direct sample analysis with time-of-flight (DSA-TOF) mass spectrometry for negatively charged hydrocarbon oil species; none were detected, indicating that no oil-based constituents were used in the paint on the walls.
[13] The addition of alum to distemper paint and claircole (size) is discussed in many painting manuals. For one such example, see Walter Pearce, Painting and Decoratin, (London, 1898), 129.
[14] Mult-layered distemper painted finishes have been identified in other architectural paint studies of sites such as the Hoboken Library. See Mary Jablonski, “Kalsomine Paint: Ubiquitous but Ephemeral,” in Macro to Micro: Examining Architectural Finishes, ed. Mary Jablonski and Kirsten Travers Moffitt (London, 2018), 38.
[15] A mixture of cyclomethicone D4 and D5 was brushed onto the surface, and a Velvesil gel with a small amount of added deionized water was applied. Velvesil Plus is a crosspolymer that consists of cyclosiloxanes with polyethylene glycol (PEG). Velvesil Plus can be mixed with water and a number of solvents (up to 20 percent) and can be removed with Cyclomethicone D4 or D5.
[16] Soot sponges are made of vulcanized natural rubber, and dirt becomes trapped in the pores of the sponge. Cosmetic sponges, which are often used to clean similar delicate surfaces, were not appropriate in this application because they removed some of the friable pigment.
[17] Thirty percent Paraloid B-72 (weight/volume) in acetone. Paraloid B-72 is composed of an ethyl methacrylate (70 percent) and methyl acrylate (30 percent) copolymer and has been tested for its longevity and reversibility as a coating and adhesive in conservation.
[18]As of October 31, 2017, “Fuel 3D software is no longer available to purchase and no further development work will be done on this product. Instead, all of our current feature set, including offline processing, is available for free to all users perpetually.” “Customer Notice: Scanify Closure,” Fuel 3D, accessed March 21, 2019.
[19] Prints were made on an Affinia H-Series 3D printer. This printer uses a technique known as fused deposition modeling in which thin strands of melted plastic are extruded through a heated nozzle. The plastic hardens immediately to form layers. The size of the printer bed is 8 by 8 by 10 inches.
[20] Fuel 3D encourages users to avoid scanning heavily burnished, severely matte, clear, or white surfaces.
[21] A blend of 3:1 Paraloid B-72:B-48N in acetone provided a strong adhesive mixture.
[22] A 2 percent solution of Paraloid B-72 (weight/volume) in acetone worked well to consolidate the surface when applied with an airbrush. It was necessary to apply the solution twice to improve the paint’s stability.